

 11
11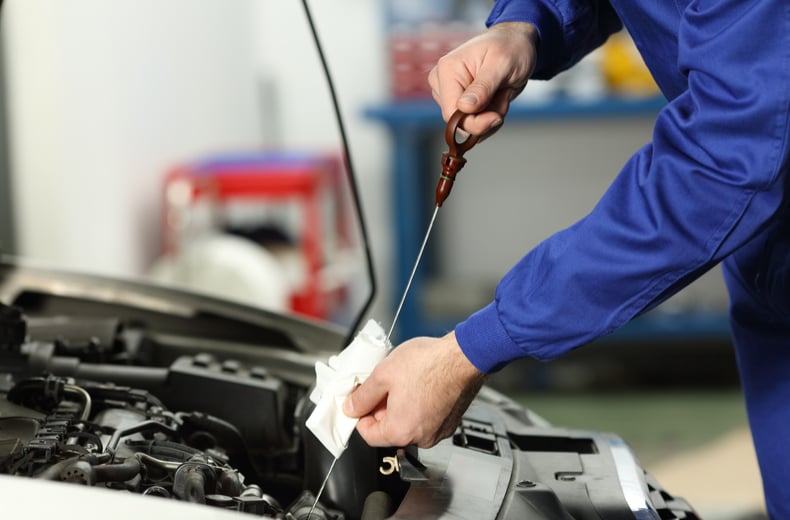
Your car’s engine is its heart, and just like your own heart, it needs regular care to perform at its best. Taking a proactive approach to engine maintenance can save you from costly repairs, improve fuel efficiency, and extend the life of your vehicle. You don’t need to be a master mechanic to handle the basics. We’ve put together a guide to essential engine maintenance that anyone can follow.
This post will walk you through the simple yet crucial tasks that keep your engine running smoothly. You will learn how to check your oil, inspect filters, check fluids, and spot potential issues with belts and hoses before they become major problems.
Engine oil is the lifeblood of your vehicle. It lubricates moving parts, reduces friction, cleans away contaminants, and helps prevent the engine from overheating. Checking it regularly is one of the most important maintenance tasks you can perform.
Prepare Your Vehicle: Park your car on a level surface and turn off the engine. For most cars, it’s best to wait at least 5-10 minutes for the oil to settle back into the oil pan. Some manufacturers recommend checking the oil when the engine is cold, so always consult your owner’s manual.
Locate and Remove the Dipstick: Open the hood and find the dipstick. It usually has a brightly colored (often yellow or orange) ring or handle. Pull the dipstick all the way out.
Wipe and Reinsert: Use a clean, lint-free rag or paper towel to wipe the oil off the end of the dipstick. Then, push it all the way back into its tube.
Check the Level: Pull the dipstick out again and look at the tip. You will see two marks, often labeled “MIN” and “MAX” or “ADD” and “FULL.” The oil level should be between these two marks. If it’s near or below the lower mark, it’s time to add oil.
Assess Oil Quality: Pay attention to the color and consistency of the oil. Fresh oil is typically amber-colored and translucent. If it looks dark, gritty, or milky, it’s a sign that it needs to be changed soon. Milky oil can indicate a serious issue, like a coolant leak into the engine.
If your oil level is low, you’ll need to add more. Unscrew the oil filler cap (it often has an oil can symbol on it) and add a small amount of the correct type of oil for your car. Add about half a quart at a time, wait a minute, and recheck the dipstick to avoid overfilling.
Just as you need clean air to breathe, your engine needs clean air to run efficiently. The engine air filter prevents dust, debris, and insects from entering the engine and causing damage. A clogged filter can reduce acceleration, hurt fuel economy, and increase emissions.
A good rule of thumb is to check your air filter every time you get an oil change. In dusty or rural environments, you may need to check it more frequently. Hold the filter up to a light source. If you can’t see light passing through it, it’s time for a replacement. Replacing an air filter is often a simple and inexpensive job that you can do yourself. Most filters are housed in a black plastic box near the top of the engine that is secured with clips or screws.
Your engine generates an immense amount of heat. The cooling system, filled with a fluid called coolant (or antifreeze), is responsible for keeping the temperature in check. Neglecting your cooling system can lead to overheating, which can cause catastrophic engine damage.
Safety First: Never open the radiator cap when the engine is hot. The system is pressurized, and hot coolant can spray out, causing severe burns. Wait for the engine to cool down completely.
Locate the Reservoir: Most modern cars have a translucent plastic coolant reservoir with “MIN” and “MAX” markings. The coolant level should be between these lines.
Topping Off: If the level is low, you can add more coolant. It’s critical to use the correct type of coolant specified in your owner’s manual. Mixing different types of coolant can cause chemical reactions that damage your cooling system.
Your owner’s manual will also recommend a service interval for flushing and replacing the coolant, typically every 30,000 to 50,000 miles. This service removes old fluid and contaminants, ensuring the system works effectively.
Your engine bay is full of rubber belts and hoses that perform critical functions. They are subject to wear and tear from heat, vibration, and age. A failed belt or hose can disable your vehicle instantly.
A quick visual inspection can help you catch problems early. When the engine is off, look at the various belts (like the serpentine belt) and hoses.
Hoses: Squeeze the coolant hoses (when the engine is cool). They should feel firm but not rock-hard. Look for cracks, bulges, or soft, spongy spots. Also, check the connection points for any signs of leaks.
If you notice any of these signs of wear, it’s time to have them professionally replaced. Addressing a worn belt or hose is far cheaper than dealing with the damage caused by a failure on the road.
Regular engine maintenance is an investment in your vehicle’s future. By spending just a few minutes each month on these simple checks, you empower yourself to keep your car reliable and performing its best. You’ll gain peace of mind knowing you’re taking great care of your car’s most vital component.
For more complex tasks or if you ever feel unsure, don’t hesitate to consult a trusted mechanic. They can perform detailed inspections and help you stick to your vehicle’s recommended service schedule.